
How to Fix And Repair Cracked Render: The Best Solution for UK Homes
Cracked render is a very common problem that UK homeowners face due to the country’s unpredictable weather and natural building movement over time. While small cracks can seem harmless, they can lead to more serious problems if left untreated, such as damp penetration, structural damage, or an unsightly exterior.
Whether you're dealing with minor cosmetic cracks or deeper structural issues, this in-depth guide will help you understand the causes, methods for fixing cracks, and how to prevent future problems.
What Causes Render to Crack?
Understanding the root causes of cracking in render and wall coatings is crucial for both preventing future issues and ensuring that any repairs you make are long-lasting. While it may seem like cracks just happen, they’re often the result of several environmental, structural, and material-related factors.
Thermal Expansion and Contraction
In the UK, the variation in weather, especially between seasons, leads to regular expansion and contraction of materials. In the summer, the render heats up and expands, while in the winter, it cools down and contracts. Over time, these cycles of expansion and contraction cause stress on the render, leading to cracks.
This is particularly an issue for older homes where the render may not have been applied with modern flexible materials. Traditional lime render, for example, is more forgiving than modern cement-based renders, which tend to crack more easily under thermal stress.
Weathering and Exposure to the Elements
The UK is known for its wet, windy, and variable climate, which can be particularly harsh on external wall coatings. In areas with heavy rainfall, prolonged exposure to moisture can cause the render to weaken and crack. The freeze-thaw cycle, where water enters small cracks, freezes, and expands, exacerbates this process.
Over time, even well-applied render can become brittle and susceptible to cracking. Coastal areas, where salt-laden winds are a factor, can also accelerate the degradation of render due to the corrosive nature of salt on building materials.
Poor Application or Incorrect Render Mix
Improper application is one of the most common reasons for cracking, especially in new builds or recently rendered properties. If the render mix isn’t properly balanced in terms of sand, cement, and water, or if it is applied too thickly in one go, it can crack as it dries.
The drying process, also known as "curing," is particularly important for preventing cracks. Render that dries too quickly will shrink, leading to small, fine cracks across the surface. Additionally, poor surface preparation (e.g., failing to apply a bonding agent on smooth walls) can result in poor adhesion, causing the render to crack and even delaminate from the underlying structure.
Structural Movement
All buildings move slightly over time due to settling, foundation shifts, or even minor seismic activity. Older UK properties, especially those built on clay soils or in areas prone to subsidence, are more vulnerable to movement.
As the structure moves, so does the render, which may not be flexible enough to cope with these shifts. Cracks in render that follow a zigzag pattern along the mortar joints may be a sign of subsidence or settlement.
Damp and Moisture Penetration
Moisture is a significant issue in the UK, where damp conditions are prevalent, particularly in older homes that may not have modern damp-proofing methods in place. If water penetrates the render, either through hairline cracks or faulty flashing, it can cause the render to deteriorate.
Once inside the wall, water can cause the underlying materials to expand, leading to further cracking. This can become a vicious cycle where moisture penetration leads to more cracks, and more cracks lead to increased water ingress.
For a more detailed analysis of building defects and moisture penetration, refer to the NHBC Standards (National House Building Council), which offers comprehensive guidelines on common causes of building failure, including cracked render. You can access more technical details via
NHBC’s official website.
How Do I Identify the Type of Crack (Superficial vs. Structural)?
Cracks in render and wall coatings can vary significantly in size, pattern, and severity. Accurately diagnosing the type of crack is essential because the method of repair will depend on whether the crack is merely cosmetic or if it indicates a deeper structural issue.
Superficial Cracks (Hairline Cracks)
Superficial cracks are thin, hairline fractures that are typically less than 1mm wide. They tend to occur on the surface of the render and do not usually penetrate deeply into the wall. These cracks are generally caused by shrinkage as the render dries, thermal expansion, or minor surface movement. Although these cracks are not a major concern structurally, they should still be addressed to prevent water ingress. Water can enter these fine cracks, freeze during colder months, and lead to larger cracks over time.
A common place to find superficial cracks is around windows or doors, where the render meets a different material. These junctions are more prone to movement due to their structural makeup and differences in thermal expansion between materials like wood, metal, and brick.
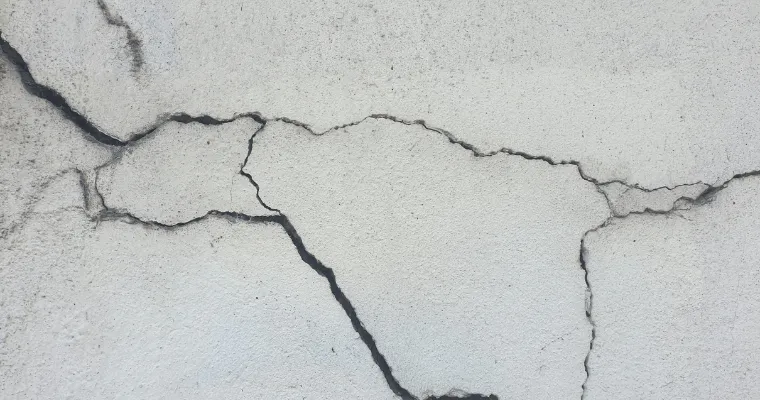
Structural Cracks
Structural cracks are much more serious and can indicate underlying problems with the building itself. These cracks are usually wider than 2mm and may extend deep into the render, affecting the masonry beneath. They often follow a diagonal or step-like pattern and are associated with structural movement, subsidence, or issues with the foundation.
If you see cracks that widen over time or are accompanied by other signs like sticking doors, sloping floors, or visible gaps between walls, you should seek professional advice as soon as possible.
Monitoring Cracks
One of the most effective ways to determine if a crack is structural or superficial is to monitor its progression over time. Crack monitors (also known as tell-tales) are simple devices that allow you to measure any movement in the crack. Place a monitor across the crack and record any changes in width over the course of a few months. If the crack remains stable, it’s likely superficial, but if it widens, it could be a sign of structural movement.
If you’re unsure about the type of crack, it’s always wise to consult with a structural engineer or building surveyor. For more detailed guidance on structural problems, the Royal Institute of Chartered Surveyors (RICS) provides a useful resource on assessing and addressing structural damage. You can visit their site at RICS UK.
What Tools and Materials Are Required for Repairing Cracked Render?
Repairing cracked render, whether minor or severe, requires a range of specialized tools and materials to ensure a long-lasting and seamless finish. Having the correct equipment on hand before starting the repair will not only save you time but also ensure that the job is done to a high standard. Below is a comprehensive list of tools and materials, along with explanations of their use and tips on sourcing them in the UK.
Essential Tools for Repairing Render
Trowel: A high-quality stainless steel trowel is an essential tool for applying render or filler. It allows you to spread the material smoothly and evenly over the surface of the crack.
Scraper: A sturdy scraper is used to remove any loose or flaking material around the crack before applying the repair compound. This ensures a clean surface for better adhesion.
Hammer and Chisel: For larger cracks, you may need to slightly widen the crack to ensure that the repair compound can properly fill the space. A hammer and chisel can be used for this purpose, especially in deeper or structural cracks.
Crack Stitching Kit: For structural cracks, crack stitching kits are available in most UK hardware stores. These kits come with stainless steel rods and specialized grout that help to reinforce the crack and prevent future movement.
Wire Brush: A wire brush is used to clean away dirt, dust, or loose particles from the area around the crack. It’s important to have a clean surface for the patching material to adhere properly.
Hawk (Plasterer’s Board): A hawk is a flat board used to hold the render mix while you work. It’s especially helpful for larger repairs where you need to apply several layers of render.
Spirit Level: Ensuring that your repair is level and even with the surrounding wall is crucial for achieving a professional finish. A spirit level helps you check that your work is properly aligned.
Materials for Repairing Render
Render or Patching Compound: Depending on the size and severity of the crack, you’ll need either a flexible patching compound (for minor cracks) or a fresh render mix (for larger or deeper cracks). For UK homes, where weather conditions can be extreme, opt for materials that are designed to withstand rain, frost, and humidity. Polymer-modified or flexible render mixes are often recommended.
Sealant: For smaller cracks or gaps around windows and doors, a flexible exterior sealant is often the best solution. Look for sealants that are designed for outdoor use and can flex with the movement of the building.
Reinforcement Mesh: For larger areas of damaged render, you may need to use reinforcement mesh to stabilize the repair. This mesh is embedded into the render to prevent future cracks from forming and to strengthen the wall's surface.
Primer: A bonding primer helps the new render or patching compound adhere to the old surface. This is especially important if you're working on porous surfaces or older render that may have lost some of its bonding strength over time.
Exterior Paint: Once the repair is complete, you’ll need to paint over the patched area to match the existing wall finish. Choose a high-quality exterior paint that’s suitable for the UK’s damp and changeable climate. Waterproof and breathable paints are ideal for preventing moisture buildup inside the walls.
For a comprehensive list of tools and materials, check out Wickes UK, which offers a range of DIY supplies for rendering and wall repairs.
What Are the Step-by-Step Instructions for Fixing Superficial Cracks?
Repairing superficial cracks in render is often a task that can be handled by homeowners with a bit of DIY experience. These hairline cracks, while unsightly, are usually easy to fix and do not require professional intervention. However, taking the time to do the repair properly will ensure that the crack doesn’t reopen and that your home remains protected from the elements.
Here’s a detailed step-by-step guide on how to fix superficial cracks in render:
Step 1: Clean the Area Around the Crack
Begin by preparing the surface for repair. Use a wire brush or scraper to remove any loose debris, dirt, or flaking paint around the crack. This ensures that the patching material will have a clean surface to bond to. For stubborn areas, a power washer can also be used, but make sure to allow the wall to dry completely before moving on to the next step.
Step 2: Apply a Primer
Once the area is clean, apply a bonding primer to the crack and the surrounding surface. This step is especially important if the render is old or porous, as the primer will help the patching compound adhere more securely. There are different types of primers available, including acrylic-based and latex-based primers. Choose one that is suitable for outdoor use and compatible with the render mix or patching compound you plan to use.
Step 3: Mix the Patching Compound
If you’re using a ready-mixed patching compound, this step will be easy. However, if you’re mixing your own render, follow the manufacturer’s instructions carefully. The mix should have the right balance of water, sand, and cement to avoid cracking after application. Polymer-modified mixes are recommended for their added flexibility, which is particularly important in the UK’s climate where temperature fluctuations can cause materials to expand and contract.
Step 4: Apply the Compound
Using a trowel, press the compound into the crack, ensuring that it is fully filled. Once the crack is filled, use the trowel to smooth the surface, making sure it’s level with the surrounding render. Be sure to feather the edges of the repair to blend it seamlessly with the existing wall. For best results, work in small sections, especially if the crack is long or the weather is warm, which can cause the compound to dry too quickly.
Step 5: Allow the Compound to Dry
Depending on the type of patching compound you’re using, drying times can vary. Most compounds will take anywhere from a few hours to a couple of days to fully cure. Be patient during this step, as rushing the drying process can lead to shrinkage and new cracks forming. If you’re working in damp or cold conditions, consider covering the area with a tarp to protect it from the elements while it dries.
Step 6: Sand and Paint the Area
Once the patch is dry, you can sand it lightly to ensure a smooth finish that blends with the rest of the wall. After sanding, apply an exterior-grade paint that matches your existing wall color. Be sure to use a paint that is specifically formulated for outdoor use and is resistant to moisture, as this will protect your wall from future cracking.
How Do I Repair Deep or Structural Cracks in Render?
Structural cracks in render require more attention and expertise than superficial cracks. These cracks are often caused by underlying issues such as foundation movement, subsidence, or significant stress within the building. If left unrepaired, they can lead to more severe damage, including water ingress and further structural weakening.
Here’s a detailed guide on how to repair deep or structural cracks in render:
Step 1: Assess the Crack
Begin by thoroughly examining the crack to determine its width, depth, and length. Structural cracks are usually wider than 5mm and may follow a diagonal or stair-step pattern. If the crack appears to be getting larger over time, or if it’s accompanied by other signs of movement (such as windows or doors sticking), it may be an indication of foundation movement or subsidence. In such cases, it’s wise to consult a structural engineer before proceeding with repairs.
Step 2: Clean and Widen the Crack
Once the crack has been assessed, use a hammer and chisel to slightly widen it. This step is important because it ensures that the repair compound will bond properly to the damaged area. Clean out any loose debris or old render from the crack, using a wire brush or compressed air to remove dust and dirt. A clean, widened crack will allow the new material to fill the space more effectively.
Step 3: Install Crack Stitching Rods (if Needed)
For larger or more serious structural cracks, crack stitching is often the best solution. Crack stitching involves inserting stainless steel rods into the crack, which helps to stabilize the area and prevent further movement. Crack stitching kits are available from most UK hardware stores and typically include stainless steel bars, grout, and a dispenser. The process involves cutting horizontal slots into the wall (across the crack), inserting the steel rods, and filling the slots with specialized grout. The rods act as reinforcements, distributing the stress across a wider area and preventing the crack from reopening.
Step 4: Apply a Bonding Primer
Before applying the render or repair compound, coat the inside of the crack with a bonding primer. This will help ensure that the new material adheres properly and forms a strong bond with the old render. Primers are especially useful in larger cracks where there’s a risk of the patch pulling away from the wall over time.
Step 5: Fill the Crack with Render or Repair Compound
Mix the render or repair compound according to the manufacturer’s instructions. For deeper cracks, apply the compound in layers, allowing each layer to dry before applying the next. This prevents the material from shrinking as it dries. If the crack is particularly deep, you may need to insert reinforcement mesh into the repair to provide additional stability. Use a trowel to press the material firmly into the crack, and smooth it out so that it’s level with the surrounding surface.
Step 6: Re-Render the Area
Once the crack has been filled, you may need to re-render the entire section of the wall to achieve a uniform finish. This is especially important if the crack is in a highly visible area, such as the front of your home. Re-rendering ensures that the repair is seamless and blends in with the rest of the wall. Apply the render in thin, even coats, and use a spirit level to ensure the surface is smooth and even.
Step 7: Paint or Seal the Repair
After the render has fully cured, sand the area to remove any rough spots, and apply a high-quality exterior paint or sealant. Choose a breathable, waterproof product to protect the repair from moisture and the effects of the UK’s variable weather. This final step is crucial for ensuring that the repair lasts for many years.
What Is the Best Way to Prevent Cracks in Render?
Prevention is the best defense against cracked render and wall coatings. While it’s impossible to completely eliminate the risk of cracks, particularly in older buildings or those located in areas with challenging soil conditions, there are several proactive steps you can take to minimise the likelihood of cracks forming.
Use Flexible and Breathable Render
One of the most effective ways to prevent cracks is to use flexible render materials that are capable of expanding and contracting with the natural movements of the building. Polymer-modified renders, which include elastic binders, are better suited to coping with the stresses caused by thermal expansion and contraction.
Lime render, which is more flexible than cement render, is also a good choice for older buildings or those in conservation areas. Its breathability allows moisture to escape from the building, reducing the risk of damp-related cracks.
Modern render systems, such as silicone-based renders, are becoming increasingly popular in the UK because of their flexibility and resistance to cracking. These systems also offer self-cleaning properties, which can help maintain the aesthetic appearance of your home.
Ensure Proper Application
Many cracks in render are the result of improper application. If the render is applied too thickly, too thinly, or without proper curing, cracks are much more likely to form. For example, if the render dries too quickly (perhaps because it’s applied in hot, dry weather), it will shrink, leading to hairline cracks. On the other hand, if the render is applied too thinly, it may not provide adequate protection against weathering and movement.
When having your home rendered, make sure the contractor follows best practices for application. This includes applying the render in thin, even layers, allowing sufficient time for each layer to cure, and ensuring the surface is properly prepared with a bonding primer.
For larger projects, consider hiring a rendering contractor who is certified by the Federation of Master Builders (FMB), which provides assurance that the work will be done to a high standard.
Maintain Proper Drainage
Water is one of the leading causes of cracked render, particularly in the UK’s damp climate. To reduce the risk of cracks caused by moisture, it’s important to maintain good drainage around your property. Ensure that your gutters and downspouts are clean and functioning properly, and direct water away from the walls of your home. Water that pools around the base of the building can lead to rising damp and render deterioration.
In addition, consider applying a water-resistant treatment to your walls, such as a silicone-based masonry cream. These treatments help to repel water while still allowing the walls to breathe, reducing the risk of cracks caused by moisture penetration.
Address Structural Issues Promptly
If you notice signs of structural movement, such as cracks in the walls, sloping floors, or sticking doors and windows, it’s important to address these issues as soon as possible. Subsidence, foundation settling, and other structural problems can lead to significant damage if left unchecked. Consult a structural engineer to assess the condition of your home and recommend appropriate repairs.
Early intervention can help prevent more serious cracking and the need for costly repairs down the line.
For more tips on preventing cracks and protecting your home from the elements, visit Historic England , which offers valuable insights into maintaining older and period properties.
When Should I Call a Professional for Help?
While many small cracks can be repaired with basic DIY methods, there are times when calling in a professional is the best option. Knowing when to seek expert help can save you time, money, and further damage to your home.
Signs of Structural Movement
If you notice wide cracks (greater than 5mm), cracks that follow a step pattern along the mortar joints, or cracks that are growing wider over time, these may be signs of serious structural movement. Other indicators of structural problems include:
- Windows or doors that no longer open or close properly.
- Cracks that appear both inside and outside the house, especially in the same area.
- Gaps between walls, ceilings, or floors.
- Sloping or uneven floors.
In these cases, it’s best to consult a structural engineer to assess the situation. They will be able to diagnose the underlying problem, whether it’s subsidence, settlement, or another issue, and recommend appropriate repairs. Ignoring these signs can lead to significant structural damage and costly repairs in the future.
Extensive Render Damage
If large sections of the render are cracked, bulging, or falling away from the wall, this could indicate deeper issues with the underlying structure or moisture problems. In these situations, it’s often necessary to remove and replace the damaged render. Re-rendering an entire wall or building is a complex job that should be carried out by a professional to ensure proper application and long-lasting results.
Damp and Moisture Problems
If your cracks are accompanied by signs of damp, such as peeling paint, mold, or a musty smell, this may indicate that water has penetrated the wall. Damp can lead to serious issues, including structural damage and health problems, if not addressed promptly.
A professional damp-proofing expert will be able to assess the extent of the problem and recommend the best course of action, whether that’s repairing the render, applying a waterproof coating, or installing a damp-proof course.
Conservation and Listed Buildings
If you live in a listed building or a conservation area, there may be restrictions on the types of materials and repairs you can use. In these cases, it’s important to consult with a professional who specializes in heritage building restoration. They will have the expertise needed to carry out repairs that are both effective and compliant with conservation regulations.
For professional advice and services, the Federation of Master Builders (FMB) offers a directory of qualified tradespeople who specialize in rendering and wall repairs. Visit their site at FMB UK to find a reputable contractor in your area.
How Do I Match the New Repair with the Existing Render?
One of the biggest challenges when repairing cracks in render is ensuring that the repair blends seamlessly with the existing wall. This is especially important for homeowners who want to maintain the aesthetic appearance of their property. Here’s how to achieve a perfect match:
Matching the Render Texture
If your existing render has a textured finish, you’ll need to replicate this texture when applying the repair. Different types of render, such as roughcast, pebble dash, or smooth render, require different techniques and tools to achieve the desired texture.
- Smooth Render: For smooth render, use a trowel to apply the patching compound and smooth it out so that it blends with the surrounding area. You may need to apply several thin layers to build up the surface to match the existing render.
- Textured Render (Roughcast): For roughcast or textured render, use a brush or textured roller to create the desired effect. If your existing wall has a more specific pattern, such as a stippled or swirled texture, you may need to use a specialized tool, like a sponge or patterned roller, to mimic the look.
For a more uniform match, you may want to experiment with different tools on a piece of scrap material before applying the repair to the wall.
Colour Matching
Once the repair is complete, you’ll need to paint the patched area to match the rest of the wall. This can be tricky, especially if the wall was last painted several years ago and the color has faded. To achieve the best match:
Take a sample of the existing paint to a paint supplier, who can mix a custom color to match.If the color difference is too noticeable, you may need to repaint the entire wall or at least a larger section to create a uniform appearance.
To avoid noticeable differences in color, try to paint the repair during similar weather conditions to when the wall was originally painted. For example, if the wall was painted in cool, overcast weather, painting on a hot, sunny day could cause the new paint to dry differently, leading to a slight color variation.
For more tips on color matching and exterior painting, visit Crown Paints Colour Matcher
What Are the Best Products on the Market for Fixing Cracked Render?
Choosing the right products for repairing cracks in render is essential for ensuring a long-lasting and professional finish. There are a variety of repair products available on the UK market, each suited to different types of cracks and damage. Here are some of the top-rated products for both DIY enthusiasts and professionals:
For Hairline and Superficial Cracks
- Toupret Exterior Masonry Repair Filler: This product is highly rated for repairing small cracks in render and masonry. It’s easy to apply and dries quickly, making it ideal for minor cosmetic repairs. Toupret also offers excellent adhesion to most surfaces and can be painted over once dry.
- Ronseal Smooth Finish Filler: A versatile filler that is suitable for both interior and exterior use. It’s easy to sand down for a smooth finish and is weather-resistant, making it ideal for small cracks in render.
For Structural Cracks
- Sika Crack Repair Kit: Sika is a well-known brand in the building industry, and their crack repair kit is designed for more serious cracks in masonry and render. The kit includes everything you need to stabilize and repair deep cracks, including crack stitching rods, epoxy resin, and a specialized filler.
- Resincoat Crack Repair Epoxy: For more serious structural repairs, Resincoat’s crack repair epoxy is an excellent choice. It’s designed to bond cracked render and masonry back together and provides a long-lasting, waterproof finish. This product is particularly effective for cracks caused by foundation movement or subsidence.
For Preventing Future Cracks
- Stormdry Masonry Protection Cream: Stormdry is a breathable, waterproofing product that is applied to exterior walls to protect them from moisture. It’s particularly useful in the UK’s damp climate and helps to prevent future cracks caused by freeze-thaw cycles.
For Professional-Level Repairs
- Weber Render Systems: Weber is a leading manufacturer of render products in the UK, offering a range of solutions for repairing and re-rendering walls. Their flexible render systems are ideal for preventing cracks and ensuring a durable, weather-resistant finish. Weber also provides products for full re-rendering projects, which are suitable for both residential and commercial properties.
For more product reviews and recommendations, you can check out DIY Doctor UK, a trusted source for DIY advice and product comparisons.
How Long Will the Repair Last, and When Should I Expect to Re-Render?
The longevity of your repair will depend on several factors, including the quality of the materials used, the severity of the original damage, and how well the repair was applied. Understanding the expected lifespan of your repairs will help you plan for future maintenance and re-rendering needs.
Small Crack Repairs
For minor cracks, such as hairline fractures, repairs can last anywhere from 5 to 10 years, depending on the quality of the filler and paint used. Applying a weatherproof coating or paint will help extend the life of the repair, especially in the UK’s wet and windy climate. Regular inspection of the repaired area is recommended, particularly after winter or periods of heavy rain, to catch any early signs of new cracking.
Structural Crack Repairs
For deeper, structural crack repairs that involve crack stitching or epoxy resin, the repair can last for 20 years or more if done correctly. These types of repairs are designed to stabilize the wall and prevent future movement, so they tend to have a longer lifespan than superficial fixes. However, it’s important to monitor the area for any signs of movement or new cracks, as this could indicate ongoing structural issues that need further attention.
Re-Rendering
If the damage to your render was extensive and required re-rendering, the new render should last for at least 15 to 20 years, provided it was applied correctly and the underlying structure is sound. Modern flexible render systems, such as silicone-based or polymer-modified renders, can last even longer due to their enhanced durability and crack resistance.
To extend the life of your render, it’s important to maintain your home’s exterior by cleaning the walls regularly and ensuring that gutters and downspouts are functioning properly. Applying a water-resistant treatment every few years can also help protect your render from the effects of moisture.
For advice on long-term maintenance of rendered walls, consult the British Board of Agrément (BBA), which offers certification and guidance on building products and systems used in the UK.
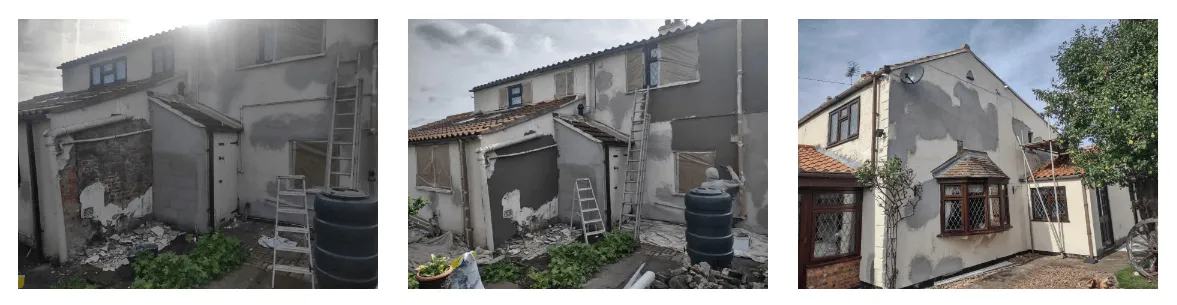
Why Wall Coatings Are the Best Option for Fixing and Repairing Cracked Render
When it comes to repairing cracked render, one of the most effective and long-lasting solutions available in the UK is the application of a high-quality wall coating system. Wall coatings not only repair and conceal existing cracks but also offer protection against future damage. Here's why wall coatings stand out as the best option for fixing and maintaining cracked render.
Durability and Longevity
Wall coatings are specifically designed to withstand the harsh environmental conditions often seen in the UK, including heavy rainfall, frost, and fluctuating temperatures. These coatings are formulated to be flexible, allowing them to expand and contract with the natural movement of the building. This flexibility is crucial in preventing new cracks from forming, especially in older buildings where render is more susceptible to damage.
Unlike traditional render, which may need to be patched or replaced every few years, wall coatings provide long-term protection. High-quality coatings can last anywhere from 15 to 20 years, and in some cases, even longer, making them a cost-effective solution over time.
Waterproof Yet Breathable
A significant cause of cracked render is moisture ingress, especially in the damp and unpredictable UK climate. Wall coatings provide a waterproof barrier that prevents rainwater from penetrating the render, which is essential for reducing the risk of freeze-thaw damage. However, while wall coatings block water from entering, they are also breathable, allowing trapped moisture within the walls to escape. This breathability helps maintain the structural integrity of the walls and prevents issues such as dampness, mold, and rot.
In contrast, using non-breathable materials or standard paints to cover cracked render can trap moisture inside the walls, leading to further cracking and deterioration over time. The breathable nature of wall coatings ensures your home stays dry, healthy, and structurally sound.
Superior Crack Bridging
One of the key advantages of wall coatings over traditional repair methods is their ability to bridge and cover existing cracks. Wall coatings are formulated to be thicker and more robust than regular exterior paints. When applied, they form a continuous membrane that spans across the surface of the wall, effectively covering hairline cracks and even larger imperfections in the render.
This crack-bridging capability means that minor cracks are filled in as the coating is applied, eliminating the need for multiple layers of filler or repair compounds. As a result, the finished surface is smoother and more uniform, with the cracks effectively sealed and protected against further damage.
Low Maintenance
Wall coatings are not only a robust repair option but also require minimal maintenance compared to traditional rendered walls. Once applied, wall coatings are resistant to dirt, grime, and algae growth, meaning they stay looking clean and fresh for years with little effort. Most high-quality coatings also have self-cleaning properties, where rainwater washes away dirt from the surface, maintaining the wall's appearance without the need for frequent cleaning.
In addition, wall coatings are resistant to UV rays, meaning they retain their colour without fading or peeling over time, even when exposed to direct sunlight. This is a major advantage over standard paints or traditional render repairs, which can often fade or discolour after only a few years.
Cost-Effective Solution
While the upfront cost of applying a wall coating system may be higher than patching or re-rendering a wall, it is a more cost-effective option in the long term. Given the durability, crack prevention, and low maintenance requirements of wall coatings, homeowners often find that they save money over time by avoiding the need for repeated repairs and repainting. Moreover, wall coatings can add value to your property by improving its appearance and protecting it from future damage.
Enhanced Aesthetic Appeal
Wall coatings are available in a wide range of colours and finishes, allowing homeowners to choose a look that complements their property's style. Whether you're looking for a smooth, modern finish or a textured, more traditional appearance, wall coatings can be customised to match your aesthetic preferences. Furthermore, the thick, protective layer of a wall coating system helps mask imperfections in the underlying render, giving your home a refreshed and more polished look.
Because they resist cracking, peeling, and fading, wall coatings help your home maintain its curb appeal for many years. For homeowners looking to improve both the function and appearance of their property, wall coatings offer a comprehensive solution.
Environmentally Friendly Options
Many modern wall coatings are designed with eco-friendly materials and manufacturing processes, making them a sustainable choice for homeowners. Some coatings are also formulated with low VOC (volatile organic compounds) levels, ensuring that they are safe for both your family and the environment.
Additionally, because wall coatings last so long and reduce the need for frequent repainting or repairing, they contribute to less waste and a lower environmental impact over time.
For those looking to enhance the energy efficiency of their home, some wall coating systems also offer insulating properties. These thermal coatings help to reduce heat loss through external walls, keeping your home warmer in the winter and cooler in the summer, which can also contribute to lower energy bills.
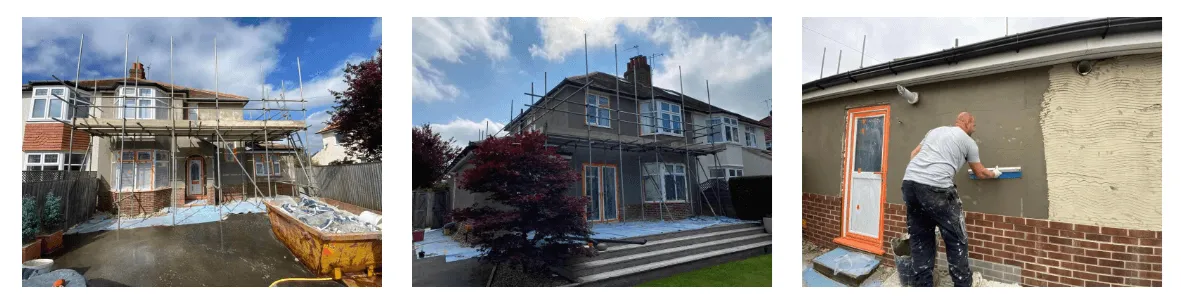
Professional Application
To ensure the best results, wall coatings should be applied by professionals who are experienced in working with these systems. The application process involves thorough preparation of the surface, including cleaning, priming, and repairing any cracks or defects in the render. Once the wall is ready, the coating is applied in multiple layers, creating a seamless, protective barrier that is far more effective than DIY render patching or painting.
Hiring a professional also ensures that the coating is applied evenly and at the correct thickness to guarantee its longevity and protective qualities. Many companies that specialise in wall coatings offer warranties of up to 20 years, giving homeowners peace of mind that their investment is protected.
For more information on professional wall coating services and options available in the UK, visit the
Wall Coating Association or consult with local experts in your area for a personalised recommendation.
To Conclude
While there are several methods for repairing cracked render, wall coatings stand out as the best solution for homeowners in the UK. With their long-lasting durability, moisture protection, crack-bridging abilities, and aesthetic versatility, wall coatings offer a comprehensive approach to maintaining and improving your home’s exterior.
By investing in a high-quality wall coating system, you can ensure that your home remains protected from the elements and retains its beauty for many years to come.
If you would like our expert company help you transform your property's exterior with one of our 15 year guaranteed wall coatings, then please call us on 020 8906 6552 or click the link below to request a free no obligation quote. We cover the whole of England and Wales and we'll beat any like for like quote.
We have teams located across the whole of England & Wales with two main offices - GET A FREE, 'no obligation' quote.
We GUARANTEE to beat ANY genuine like for like quote!!!
London Office: Daws House, 33-35 Daws Lane, London, NW7 4SD
South West Office: The Apex, Derriford Business Park, Brest Road, Plymouth, PL6 5FL